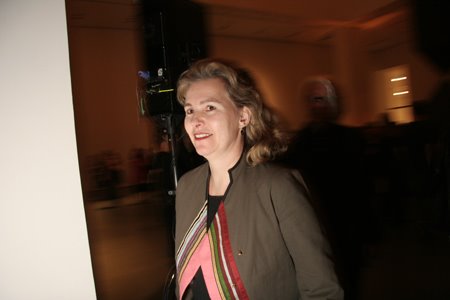
 Photograph Stephenie Hollyman
Do sometimes you favor flash, pan and burn photography? If you are like me, you set your flash on manual and use a long shutter speed. Then setting your camera on first curtain sync you pan and blur the back ground. You cross your fingers and pray then check the LCD screen to see if you caught the moment.
I took this photo last week while shooting an event for a major museum. Towards the end of evening after I had taken the " safe" pictures required for any event I stationed myself by the stairway and panned at a 1/15 of a second as people whisked by, pointing my off camera flash to the side, clad with its Gary Fong Light Dome.
Neil Turner maintains one of the most helpful websites, dg28.com I have found re lighting. If you click on Lighting Technique you'll find answers and how-I-shot-the-assignment examples for many of the technical conundrums we all face daily trying to make silk from a sow's ear when a subject isn't that interesting visually.
All of us have played with this. Sometimes it works, sometimes not. We have learned to use this as a " toy", after getting the shot we know we want for sure. Here's a tip from Neil to raise the ante so that your next flash, burn & pan (FBP) shot becomes a keeper.
Neil's Flash Burn and Pan Tip
Neil tells us to keep the flash off camera so the subject has some shadow over which the ambient light can blur. Then he tells us when we pan to move the camera TOWARDS the light. That's how I took the picture above.
You compose the picture and during the relatively long exposure you deliberately move the camera. This one was left to right. You need to move the camera towards the flash in most cases. The ambient light then blurs and the subject is frozen where the flash catches him. It's good if the flash is off camera because the effect is strengthened by the subject having some shadow on him, over which the ambient can blur. This is done entirely "in camera" and requires no photoshop alteration. With a digital you can check what you've done on the screen and alter the light balance/direction of movement/angle of movement accordingly. I originally learned to do this using transparency film and a lot of it! I also tend to explain to the confused looking person that it's a technique to move the camera, otherwise you may have them thinking you're a bit mad!!